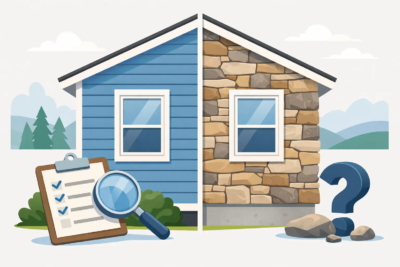

A stone-faced chimney, entry column, or front elevation should look like it belongs to the house, not like a layer added after the fact. That result starts behind the stone. When homeowners ask what supports stone veneer, the answer is not simply “mortar.” Manufactured stone veneer depends on a properly prepared wall assembly that carries the veneer, manages water, and provides a stable surface for years of changing Shenandoah Valley weather.
Stone is the visible finish, but the substrate, weather barrier, flashing, and installation details do the quiet work that protects the home.
What Supports Stone Veneer?
Manufactured stone veneer is generally an adhered veneer product. It is not a load-bearing wall and it does not replace structural framing, masonry, or a foundation. Instead, it is supported by an approved substrate and bonded in place with mortar. The exact assembly depends on whether the veneer is being installed over existing masonry, wood framing, concrete block, or another approved surface.
A properly built wall must handle two jobs at once. It must provide a sound, stable base for the weight of the veneer, and it must direct water away from the wall system. A beautiful field stone façade can lose its appeal quickly if moisture is trapped behind it or if movement in the wall causes cracking.
For that reason, the right support system is always tied to the application. A new front elevation on framed construction is detailed differently than a veneer upgrade on a solid brick chimney. Columns, foundations, retaining features, and interior accent walls each deserve their own approach.
Direct Bond to Sound Masonry
Concrete, concrete masonry units, and properly prepared masonry walls can often support stone veneer directly. The surface must be clean, structurally sound, and free of paint, dust, efflorescence, loose mortar, or other materials that could interfere with the mortar bond.
On a suitable masonry surface, an installer may prepare the wall and apply veneer mortar directly, following the stone manufacturer’s installation requirements. This is one reason a masonry fireplace surround or concrete-block foundation can be an excellent candidate for a stone upgrade. The existing wall already provides a firm, noncombustible backing.
“Existing masonry” is not automatically the same as “ready for veneer,” however. An old brick wall with failing joints, a painted block wall, or a moisture-damaged chimney may need repair and preparation first. Veneer should never be used to hide an active structural or water problem.
Framed Exterior Walls Need a Complete Assembly
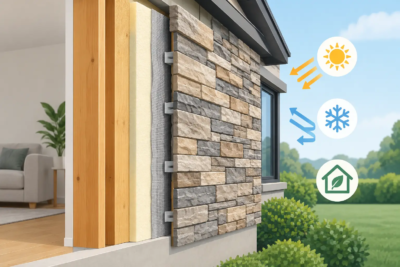
Most residential exterior veneer projects in Virginia are installed over wood-framed walls. In this application, stone veneer relies on several layers working together, beginning with framing and exterior sheathing that meet applicable building requirements.
Over the sheathing, installers use a water-resistive barrier system appropriate for the wall design and local code. This layer is essential. Stone veneer and mortar are durable, but they are not a waterproof skin. Wind-driven rain can reach behind the face of the veneer, so the wall must have a reliable drainage plane that sends moisture back to the exterior.
Metal lath or another approved reinforcement layer is then installed over the weather-resistive barrier. A scratch coat of mortar is applied to create a textured bonding surface. Once that coat has cured as required, individual veneer pieces are set into mortar and tooled at the joints when a mortared-joint stone profile is used.
That sequence gives the veneer a stable mechanical and mortar-supported base. It also helps separate the decorative stone face from the house’s structural framing and moisture-control layers.
Flashing Is Part of the Support System
Flashing is easy to overlook because it is mostly hidden after the project is complete. It is still one of the most important details behind a lasting installation.
Proper flashing is typically needed where veneer begins and ends, around windows and doors, at roof-to-wall intersections, above projecting features, and at transitions to other cladding materials. Weep screeds and drainage details near the base of an exterior wall allow water that reaches the drainage plane to escape.
The goal is straightforward: water should have a path out, not a place to collect. On an entry feature, chimney chase, or full front façade, thoughtful flashing details protect the investment behind the finished stonework.
The Foundation and Ledge Matter at Ground Level
Stone veneer does not usually require the oversized stone ledge associated with full-bed natural stone, but the bottom of the installation still needs proper support and clearance. The veneer cannot simply hang down into the soil or rest where repeated moisture exposure will create trouble.
Exterior installations should begin at an appropriate height above finished grade, paving, roofs, decks, or other horizontal surfaces, according to the product instructions and code requirements. At foundation walls, installers use suitable termination and drainage details so the veneer is supported while moisture can escape.
This is especially relevant on sloped Shenandoah Valley properties. A grade that looks level from the street may rise significantly along one side of the home. Planning the veneer layout before installation helps maintain proper clearances and avoids awkward transitions where stone meets soil, siding, or porch surfaces.
Interior Stone Veneer Has Different Requirements
Interior accent walls and fireplace surrounds do not face rain, freeze-thaw exposure, or exterior drainage demands. They still need a stable, approved substrate that can accept the weight of the stone and mortar.
Depending on the surface and product, interior veneer may be installed over properly prepared drywall, cement board, masonry, or another approved backing system. A heavy textured field stone profile may call for more preparation than a lighter, low-profile product. The wall must also be flat enough to keep the finished surface looking intentional rather than wavy.
For fireplaces, clearances and noncombustible requirements around the firebox, insert, and mantel area must be addressed before the stone is selected. The best design decision is one that respects both the desired look and the appliance manufacturer’s requirements.
Support Is About More Than Weight
A square foot of manufactured stone veneer has real weight, but a good installation is not only about whether the wall can hold it. Movement, water, and transitions are often the deciding factors in long-term performance.
Wood framing can move slightly with seasonal humidity changes. Concrete and masonry can shrink, settle, or crack. Different materials expand and contract at different rates. That is why installers pay close attention to control joints, dissimilar-material transitions, and areas where a wall meets a roof, deck, window, or structural beam.
The mortar bond must also be continuous and properly applied. Buttering the back of each stone and pressing it firmly into the setting bed helps create strong contact. Gaps behind the stone can weaken the bond and invite moisture concerns. This is craftsmanship that cannot be judged only from the curb.
Choosing the Stone Profile Affects the Installation
The substrate system may be similar across many manufactured stone products, but the stone profile affects layout, cutting, joint treatment, and visual balance. Ledge stone creates a horizontal rhythm that suits foundations and contemporary façades. Field stone offers a more varied, timeless character for chimneys and broad wall areas. Cut stone can bring order and formality to entryways, while stack stone creates clean shadow lines for accent walls and columns.
Finishing pieces matter as well. Corners, keystones, wall caps, pier caps, and coordinated architectural details make a veneer project feel complete. They also help create clean transitions where a flat wall face meets an outside corner, a column top, or a landscape feature.
A well-chosen profile should fit the home’s scale. Large, rugged stone can overwhelm a small entry if used without restraint, while a refined cut stone may disappear on a broad, rural-style façade. The right support system makes the installation durable; the right stone selection gives it character.
When to Ask for a Professional Evaluation
A qualified stone professional should review the project before work begins when the wall has signs of moisture damage, cracking, settling, rot, loose brick, or an uncertain backing material. The same is true when veneer will be installed over an existing finish, around a fireplace, on a chimney, or near grade.
Builders and remodelers should also coordinate veneer details early, before windows, roofing, trim, and exterior lighting are finalized. That timing makes it easier to integrate flashing, drainage, stone thickness, and finish transitions without costly revisions.
Grizzly Stone helps homeowners and trade professionals select manufactured veneer profiles and finishing components that suit the project, but installation details should always follow the selected product’s requirements, local code, and the conditions of the specific wall.
The most successful stone projects begin with a solid surface you may never see again. Give the support system the same attention as the stone itself, and your chimney, façade, column, or accent wall can look at home for decades.