
A front chimney, entry wall, or full façade can change the entire character of a home. Before choosing a stone profile or color blend, however, the veneer coverage calculation needs to be right. Ordering too little can delay installation and complicate color matching. Ordering far too much adds unnecessary cost and leaves material that may not be useful on the next project.
For manufactured stone veneer, coverage is not simply a matter of measuring the side of the house and buying that many square feet. Windows, doors, corners, stone cuts, mortar joints, and finishing details all affect the final number. A careful takeoff gives homeowners, builders, and masons a dependable starting point for an estimate and a better path to a finished design that looks intentional from every angle.
Start With the Gross Wall Area
Measure each surface that will receive flat stone veneer. Multiply the width by the height of every rectangular section, then add those sections together. For a gable, measure the rectangular wall below it separately from the triangle above it. Triangle area is its width multiplied by its height, divided by two.
For example, a 24-foot-wide wall that is 9 feet high has 216 square feet of gross area. If it includes a gable that is 24 feet wide and 6 feet high, the gable adds 72 square feet. The gross wall area is 288 square feet before subtracting openings.
Measure in feet and inches consistently. Convert inches to decimals when necessary. A 30-inch-wide window is 2.5 feet wide, while a 42-inch-wide door is 3.5 feet wide. On larger elevations with several bump-outs, chimney returns, or varying wall heights, sketch the façade and label every dimension. The sketch does not need to be an architectural drawing. It simply needs to prevent one surface from being measured twice or missed entirely.
Subtract Meaningful Openings
Next, calculate windows, doors, garage doors, and other areas that will not receive veneer. Multiply each opening’s width by height, then subtract those areas from the gross wall area.
Using the 288-square-foot example, imagine the wall has one 3-by-5-foot window and a 3-by-7-foot door. The window is 15 square feet and the door is 21 square feet, for 36 square feet of openings. The net flat-stone area is 252 square feet.
Small penetrations and minor openings are handled differently. A hose bib, electrical box, small vent, or similar detail still creates cuts and layout work, even though it removes very little material. Many installers do not deduct openings under about 3 square feet because the usable offcuts are limited. The right approach depends on the stone profile, the pattern, and how close the opening sits to corners or trim.
Do not subtract areas that will be covered by a coordinated feature unless that feature replaces the veneer entirely. For instance, a keystone or address stone installed within a fieldstone wall does not eliminate much stone coverage. A broad wood mantel surround, large metal fireplace insert, or full-width trim panel may.
Keep Flats and Corners Separate
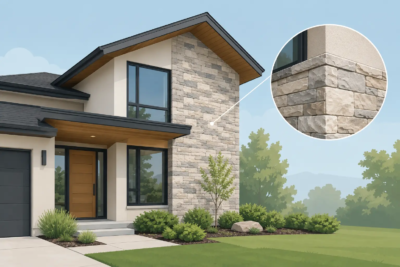
This is the step that causes the most confusion in a veneer coverage calculation. Flat veneer is ordered by square feet. Corner pieces are ordered by linear feet because they wrap around outside corners and create the appearance of full-depth stone.
Measure the vertical length of every outside corner receiving stone. Include corners on chimneys, columns, bump-outs, foundation projections, and return walls. Add those lengths to determine the required linear feet of corner pieces.
Corner veneer also covers some wall area. Manufacturers commonly state how much flat coverage is displaced by each linear foot of corners, often around 0.75 square foot per linear foot, but the exact allowance varies by product. Subtract the manufacturer’s stated flat-equivalent coverage for the corners from the net flat area. Do not guess at this conversion. A ledge stone corner and a larger fieldstone corner can use material differently.
Inside corners usually use flat stone or a profile-specific installation approach rather than manufactured corner units. Still, they require more cuts and should influence the waste factor.
Add Waste for Cuts, Pattern, and Site Conditions
Waste is not a sign of poor planning. It is the material needed to make the installation look natural rather than forced. Stones must be cut around openings, fit at terminations, maintain a balanced pattern, and avoid obvious repeating shapes.
For a simple rectangular wall with one stone profile and few openings, 5 to 7 percent extra material may be appropriate. A chimney, curved feature, multiple windows, numerous corners, or a highly irregular stone style often calls for 10 to 15 percent. Complex layouts may need more, particularly when stone is being blended from several pallets or when matching an existing installation.
The profile matters. Stack stone and ledge stone may create efficient courses on a broad wall, but returns, corners, and tight transitions can produce smaller offcuts. Random fieldstone can use a wider range of pieces, yet its irregular shapes require thoughtful fitting. Cut stone can deliver clean lines but may need careful sizing around trim and openings.
Waste should be applied after the flat area has been adjusted for openings and corner displacement. If the calculated flat coverage is 225 square feet and the project needs a 10 percent allowance, order material for about 248 square feet, subject to the product’s packaging and the supplier’s guidance. It is generally wiser to round up to full boxes or pallets than to leave an installer short near the end of the job.
Account for Mortar Joints and Product Coverage
Not all stone veneer is measured or installed the same way. Some products are designed with visible mortar joints. Others are dry-stacked or installed with tighter joints. Published coverage is generally based on the intended installation method, including the joint spacing specified for that product.
That means a box labeled for a certain square-foot coverage should not be treated as a raw stone measurement that can be stretched farther through wider joints. Excessively widening mortar joints changes the appearance of the wall and can make a carefully selected profile look sparse. Conversely, installing stones tightly when the listed coverage assumes mortar joints can leave a project short.
Review the specific product information before finalizing quantities. Confirm whether coverage is based on installed face area, whether corner pieces are sold separately, and whether mortar, lath, flashing, scratch coat materials, and fasteners are included in the estimate. Those materials are not part of veneer square footage, but they are part of a complete installation budget.
Do Not Forget Caps, Sills, and Architectural Details
A polished stone project is measured in more than square feet. Wall caps, pier caps, hearthstones, window sills, address numbers, and keystones are typically counted by individual piece, linear foot, or custom dimension. They should be listed separately from field veneer.
This matters most around columns, retaining walls, entry features, and fireplaces. A column may need flat veneer, corner veneer, a cap, and perhaps a coordinated address element. Measuring only the visible stone faces can leave out the component that gives the feature its finished top line.
For exterior façades, also identify transitions at siding, brick, stucco, roofing, grade, and door or window trim. Good planning establishes where the veneer begins and ends before materials are ordered. It is much easier to select a clean termination detail on paper than to solve it after stone has reached the jobsite.
A Practical Takeoff Checklist
Before requesting an estimate, prepare the gross wall measurements, opening sizes, outside-corner lengths, and a few clear photos of the project area. Note the intended stone profile, whether the work is new construction or a remodel, and any finishing pieces you want included. Photos of adjacent siding, roof color, trim, and existing masonry are especially helpful when choosing a stone blend that belongs with the rest of the home.
For homeowners across the Shenandoah Valley, a professional measurement review can be worthwhile on any prominent or complex feature. Grizzly Stone can help translate a measured wall into the appropriate combination of flats, corners, and coordinated details, while keeping the desired architectural look in view.
The best veneer coverage calculation does more than prevent a material shortage. It gives the installer room to create balanced joints, convincing corners, and clean transitions – the details that turn a stone order into a home feature worth noticing for years.